Italian Wedding Soup

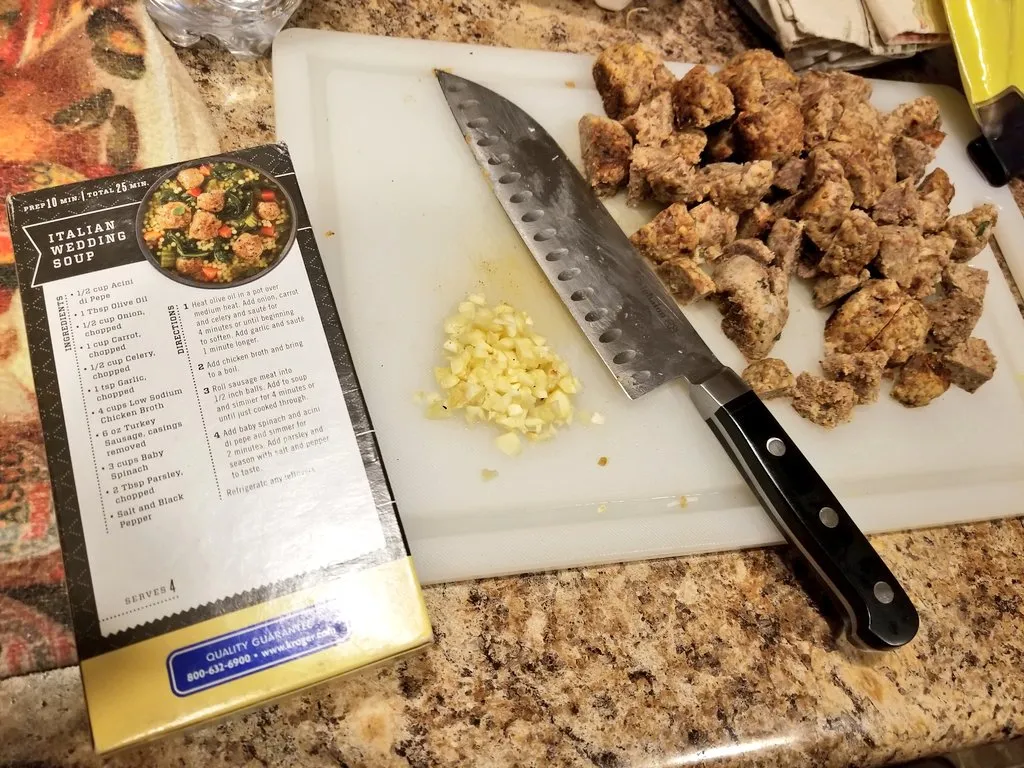
We found this recipe a couple of years ago on the back of a box of pasta at the City Market grocery store in Breckenridge, CO. There are a bunch of variations online, but this one is really simple and we use it as the base for our variations.

Options:
• If you make broth from your Thanksgiving Turkey, this is a perfect use for that broth. 
• If you’re using sausage and in a rush, you can slice the sausage into thin slices. It’s not traditional but it gets the same flavor.
• If you’re like us and make large batches of Italian Meatballs, you can use your leftovers in this recipe instead of the sausage. Just cut large meatballs down into 1/2 inch pieces.
• We found a recipe that includes cherry tomatoes. We add those, too, from time to time because we like the extra flavor, even though it’s not traditional.

A picture of a cutting board and ingredients for Italian Wedding Soup.
Preparing Italian Wedding Soup

Ingredients

  • 2 tablespoons Olive Oil
  • 1 cup onion, chopped
  • 1 cup carrot, chopped
  • 1/2 cup celery chopped
  • 1 tablespoon garlic, chopped
  • 4 cups chicken broth (use fresh if you have it)
  • 1 teaspoon red pepper flakes (optional)
  • 1 lb Italian Sausage (or your favorite sausage) or Italian meatballs
  • 1 cup Acini de Pepe pasta
  • 1/2 cup cherry tomatoes, cut into halves (optional)
  • 3 cups of baby spinach or kale (or a mix of both)
  • 2 tablespoons parsley, chopped (for garnish)
  • Salt & pepper for taste
A picture of Italian Wedding Soup cooking
Italian Wedding Soup

Directions

  1. Prep your vegetables.
    Heat the olive oil in a pot over medium heat. Add the onion, carrots, and celery. Saute for 4 minutes, of until they are starting to soften. Add the garlic and saute for a couple more minutes.
  2. Add the chicken broth and red pepper flakes (optional) and bring it to a boil.
  3. Roll the sausage meat into 1/2 inch meatballs. or cut it into small slices. If you’re using traditional meatballs, cut them into halves or quarters so they are about 1/2 inch.
  4. Add the meatballs to the soup and simmer for 4 minutes, or until the meatballs are cooked through. 
  5. Add the baby spinach or kale, and the acini di pepe pasta and cherry tomatoes (optional) and simmer for 7 more minutes. Add salt & pepper to taste.
  6. Serve up in large bowls. Add the chopped parsley as a garnish on the soup.
Advertisement

Smoked Jalapeño Sauce

This sauce came about because we wanted to find a way to use some fajita ingredients with pasta. A really good friend gave us a huge basket of jalapeño peppers from her garden and we used these in the smoker. We’ve been making a Doña sauce for years and this is a variation of the Smoked Doña Sauce. The primary difference is the sauce we made tonight wasn’t intended to be used like a salsa, it’s more a base for something else. It’s definitely much spicier and intense than the doña sauces.

Smoked Jalapeno Sauce being mixed in the blender.

Smoked Jalapeno Sauce being mixed in the blender.

Ingredients

  • 1 lb of fresh red ripened jalapeños,
  • 6 cloves of garlic,
  • 1/4 cup evoo.
  • 2 cups water
  • 1 teaspoon kosher salt

Instructions

  1. Smoke the jalapeño peppers (See smoking instructions here)
  2. Blanch the peppers and garlic in 2 cups of water for 20 mins
  3. Put everything in a blender and process until smooth, adding a teaspoon of kosher salt.

Makes a spectacular dipping sauce and base for a pasta dish! We mixed it tomato sauce then added it to pasta, fajita beef and grilled vegetables – it’s definitely worth a try!

Here are some pictures of the process:

Jalapenos being put into the smoker.

Jalapenos being put into the smoker.

Jalapenos after they have been smoked.

Jalapenos after they have been smoked.


Fajita pasta with smoked jalapeno sauce.

Fajita pasta with smoked jalapeno sauce.

Smoked Jalapeno Sauce being mixed in the blender.

Smoked Jalapeno Sauce being mixed in the blender.

Homemade Pasta with Goose Eggs

Here is our story about our experience comparing semolina flour versus all-purpose flour when making homemade pasta using goose eggs.

It all started a couple weeks ago when we went to dinner with some friends and one of them had just bought some goose eggs from a local farmer. We all decided it would be fun to have a dinner party and everyone pitch in to make pasta. We had this dinner last Sunday and it was a fun evening of wine, pasta, and good company.

Last Sunday, Steve used a recipe he found online that used a combination of goose eggs and chicken eggs. His recipe also called for a mixture of semolina flour and all-purpose flour. I can’t find the recipe he used but it had all the elements of a standard pasta recipe: eggs, flour, salt, olive oil and water. When the dinner was over, Steve sent us home with some goose eggs so we could try them out ourselves.

Since we had never used semolina before, we picked some up at the grocery store so we could try using it in our own pasta. Yesterday we decided to make two batches of pasta to compare using the different flours in our pasta. The first batch is using a goose egg with semolina flour and the second batch is using one goose egg with all-purpose flour. We really are just doing this so we can do a side-by-side comparison of the two flours.

Something to know about goose eggs is that they are very large and have large, bright yellow yokes. The ones we got seem to be about the size or 2 or 3 chicken eggs. We had to compensate a little with the flour quantity to get the right texture for the dough but we’ve made enough dough to be able to do so without much trouble.

Pasta from Semolina Flour and Goose egg:

For the first batch of pasta, we used Bob’s Red Mill Semolina Pasta Flour that we bought at our local grocery store. If you can’t find it in your store, you can buy some online. Since we hadn’t made any pasta like this before, we used the recipe on the package.

Ingredients

  • 1 1/2 cup of semolina flour
  • 1/2 teaspoon salt
  • 2 eggs (we substituted 1 goose egg)
  • 2 tablespoons water
  • 2 tablespoons olive oil

Pasta from All-Purpose Flour and Goose Egg:

For this batch, we used regular all-purpose flour but we didn’t have a recipe to use for comparison. I went with a recipe from one of my favorite TV Chefs,  Lidia Bastianich. The proportions are slightly different, but basically the same recipe.

Ingredients

  • 2 cups all-purpose flour
  • 1/2 teaspoon of salt
  • 2 large eggs (we substituted one goose egg)
  • 1/4 cup olive oil
  • 3 tablespoons of cold water

Instructions for both pasta recipes

Since we wanted to compare the two flours, we used the same mixing process.

Combine the flour and salt in a large bowl. In a second bowl, add the egg and beat it to mix it up then add the water and olive oil. Next, add the egg, water, and olive oil mixture to the semolina flour and salt. Mix in the bowl until you have a stiff dough. Then move it onto a floured counter top and knead the dough for 10 minutes. Then, put the dough into a zip-lock bag and allow it to rest for at least 20 minutes.

After resting the past, we used our pasta roller to get down to the 2nd thinnest setting and then used the linguine cutter on the pasta roller to cut the pasta in a consistent manner.

Summary of our comparison:

We really wanted to taste a difference in the two pastas, however, we really didn’t taste a difference. There was a slight textural difference but I don’t think it was enough that I would have noticed it.

  • When we were mixing the pasta and kneading it, the semolina mixture was grittier and stickier so I was a little concerned. The all-purpose flour mixture was very silky and smooth and seemed like it was exactly what you wanted.
  • However, after resting, the texture was reversed and the semolina was not near as sticky and it went through the pasta roller without any trouble. The all-purpose flour had become stickier and we to add some flour to keep it from sticking to the pasta roller as it went through.
  • Cooking the pasta seemed to be identical in time needed to cook them. We cooked it in small batches for about 3 minutes per batch.
  • The taste of the final pasta really was indistinguishable. I couldn’t tell a difference when it came to taste.
  • The final texture is where we saw the biggest difference. Even though we rolled both pasta mixtures the same way and to the same setting, however, the semolina flour seemed thicker, even though it should have been exactly the same thickness. Once cooked, it held onto the seemingly thicker status and seemed more substantial and toothsome. The semolina pasta also seemed more structurally stable. However, I don’t think it was enough to have noticed if you weren’t intentionally doing a side-by-side comparison.
  • I would like to try this comparison again using regular store bought chicken eggs just to see if it was goose eggs that made the difference.

Here is Ryder checking out the pasta as it was resting.

Ryder checking out our rolled pasta

Ryder checking out our rolled pasta

Just for fun, here are some pictures from our first experiment using the goose eggs last weekend. This first picture is one goose egg in a bowl. You can see the two chicken eggs in the background for a comparison of the size.

Goose egg in a bowl

Goose egg in a bowl

Here is a picture of the bowl with 2 goose eggs (on the left side) and 2 chicken eggs (on the right side).

Mixing bowl with 2 goose eggs and 2 chicken eggs

Mixing bowl with 2 goose eggs and 2 chicken eggs

Here is one of us using the chitarra to cut the past.

Here we are using the chitarra to cut the pasta.

Here we are using the chitarra to cut the pasta.

This is Curt breaking open the first goose egg. You can tell by his voice that he was surprised at the size of this egg.

Finally, here is a clip of Steve using the chitarra for the first time.

Fennel, Onion & Sausage with Penne

This post is long over due. We fell in love with fennel over this past summer. We were at the farmer’s market and went to the booth of our favorite farmer. We always get peppers from him because he has the best variety, especially the shishito peppers. He talked us into getting a couple really large pieces of fennel. We didn’t know what to do with it but said “OK” and took some home with us. As luck would have it, later that weekend we saw an episode of Lidia’s Italy using fennel in a sauce with sausage and serving it with ziti pasta. It’s actually a pretty easy recipe so we tried it, and really liked it. It’s amazing how much the fennel changes when you saute it.

We’ve adjusted this recipe from Lidia’s, just because we can. You can find the original recipe on Lidia’s website. The original recipe calls for a pound of pasta but we find that 1/2 pound is plenty and allows the fennel and sausage to be the stars of the dish. Plus, it gives plenty of pasta for 2 grown men to have dinner and have some left overs for lunch on a later day. We also like using the sliced link sausage instead of ground sausage for the same reason. We usually get the best sausage we can get. This time we’re using Hot Chicken Italian Sausage. We served this with steamed summer squash with red pepper flakes.

20161228_Fennel_Sausage_Pasta.jpeg

Fennel Sausage Pasta

Ingredients

  • Salt for the pasta water
  • 1/2 pound penne
  • 1 pound hot Italian sausage, we use linked sausage
  • 1 large fennel bulb
  • 1/3 cup extra-virgin olive oil
  • 2 medium onions, cut into half-moon slices
  • 3 cloves minced garlic
  • 1/2 teaspoon salt
  • 1 teaspoon red pepper flakes
  • 1/2 cup tomato paste
  • 1/3 cup finely chopped fennel fronds
  • 1 cup freshly grated Grana Padano or pecorino cheese

Directions

Heat a pot of water to a boil and add the sausage. Parboil the sausage for 5 minutes and then put it in a 350 degree oven for 10 minutes to finish cooking it. It would be just as tasty grilling the sausage.

Save the water and use it for the pasta. Skim the water to remove the fat floating at the top and add some fresh water to get enough for your pasta. Heat the water back to a boil and then cook your penne following the directions on your package. Reserve 3 cups of the pasta water to add later for the sauce.

To prepare the fennel, trim the bulb and remove any tough outer parts. Reserve the fronds. Slice the bulb in half lengthwise, remove the core and then slice each half in 1/4 inch thick lengthwise slices. Separate the slivers of fennel if they are attached at the bottom and then cut the long slivers in half, so you have about 3 cups of 2 inch long slices of fennel.

Heat the olive oil in a skillet over medium-high heat. Add the onion and cook for a few minutes until they sizzle and wilt. Next, add the fennel and cook for another minute or two. Once the fennel has started to soften, add the garlic. Sprinkle on 1/4 teaspoon if salt and the red pepper flakes and stir to combine. Now, push the onion & fennel to the side of the pan and add the tomato paste. Stir the tomato paste in the spot you added it to for a minute or two until it is sizzling, then stir it in with everything else.

By  now your sausage should be finished cooking. Slice your sausage links into 1/4 inch slices and then add it to the mixture in your skillet.

Ladle in the reserved pasta water and stir well. Bring the liquid to a boil and then reduce to a simmer. Let the mixture cook until the flavors meld and the sauce is thickened, about 6 minutes. Add more water if the sauce reduces too rapidly.

Add the cooked penne into the sauce and gently fold it into the sauce. Allow it to meld for few minutes. Now add the fennel fronds and mix it into the sauce.

Once it is ready, sprinkle on the cheese and allow it to melt. Then serve into warm pasta bowls.

20161228_Fennel_Sausage_in_pan.jpeg

Our pasta cooking in the pot

Chipotle Pasta Salad

I’ll be honest, this is my FAVORITE pasta salad. I think of this salad as the perfect summer pasta salad, but to be honest, we make it year round because we like it so much. I posted the recipe for the chipotle paste that is used in this salad in a post yesterday. This is the punch that gives this pasta salad a great flavor.

You can use any type of pasta that you like this. We used to get a big bag of multi-colored garden rotini from Sam’s Club but we haven’t seen it at our location lately. This was a great noodle for this salad because it holds up great and the color makes it fun. The Sam’s  website shows it should be in stock at our location so we’ll have to look for it again. In the pictures, we’re using a fusilli pasta from Trader Joe’s. We’ve also used farfalla pasta in the past but it broke apart so I’d stick with a thicker pasta with more grooves on it.

Ingredients

  • 1 pound dried pasta of your choice
  • 1 cup mayonnaise
  • 1/4 cup chipotle paste (see recipe)
  • 2 roma tomatoes, diced
  • 2 carrots, julienned
  • 1 medium red onion, diced
  • 1/2 cup cilantro, chopped (can substitute parsley)
  • 1 jalapeño, finely diced (optional)
  • 1 tsp  sea salt, or to your preference

Directions

To start, cook your pasta noodles according to the directions on the package. Definitely pay attention to the time and don’t over cook this pasta or it will fall apart while you’re mixing it. Read the next step before you finish. You’re going to put the hot pasta water into a bowl with the red onions and carrots to soften them.

While the pasta is cooking, get your vegetables ready. Once they’re cut, put the red onions and carrots into a small glass bowl. When the pasta is finished cooking, pour the hot water into the bowl with your red onion and carrots. Let this soak for about 10 minutes. Then, drain the carrots and onions and rinse well.

Now, mix the mayonnaise with the chipotle paste until it’s well mixed. It should turn a pinkish color.

Pre-mixed Pasta Salad

Pre-mixed pasta salad with the onions, carrots, parsley and jalapenos and noodles

Add the pasta noodles, tomatoes, carrots, red onion, cilantro, jalapeño, and the mayonnaise chipotle paste mixture into a large bowl and gently fold the ingredients together.

If you look close, you’ll see that the picture actually uses parsley instead of cilantro. It gives the salad a different flavor but it’s just as good. If you have family members who don’t like cilantro, just substitute the cilantro for parsley and it will turn out great.

Once the noodles are well coated with the mayonnaise chipotle mixture, you are good to go. You can eat it right away or “sample” it just to make sure 😉 – however it’s best if you put it in the refrigerator and let it cool for at least an hour.

Chipotle Pasta Salad after it's been mixed.

Chipotle Pasta Salad after it’s been mixed.

Obviously, this makes a bunch of pasta salad and way more than 2 people can eat in one meal. It’s a perfect side to take with you to a BBQ or summer cookout. It also likely means leftovers! This salad will last a week or so in the refrigerator. When we serve it, we’ll sometimes put it over a bed of lettuce which adds a nice texture to it. For lunch, I’ll sometimes take a small bowl of this pasta salad and mix in some tuna for a tuna salad – this is so great and easy for a lunch at work.


Buckwheat Pasta on the Chitarra

Buckwheat pasta

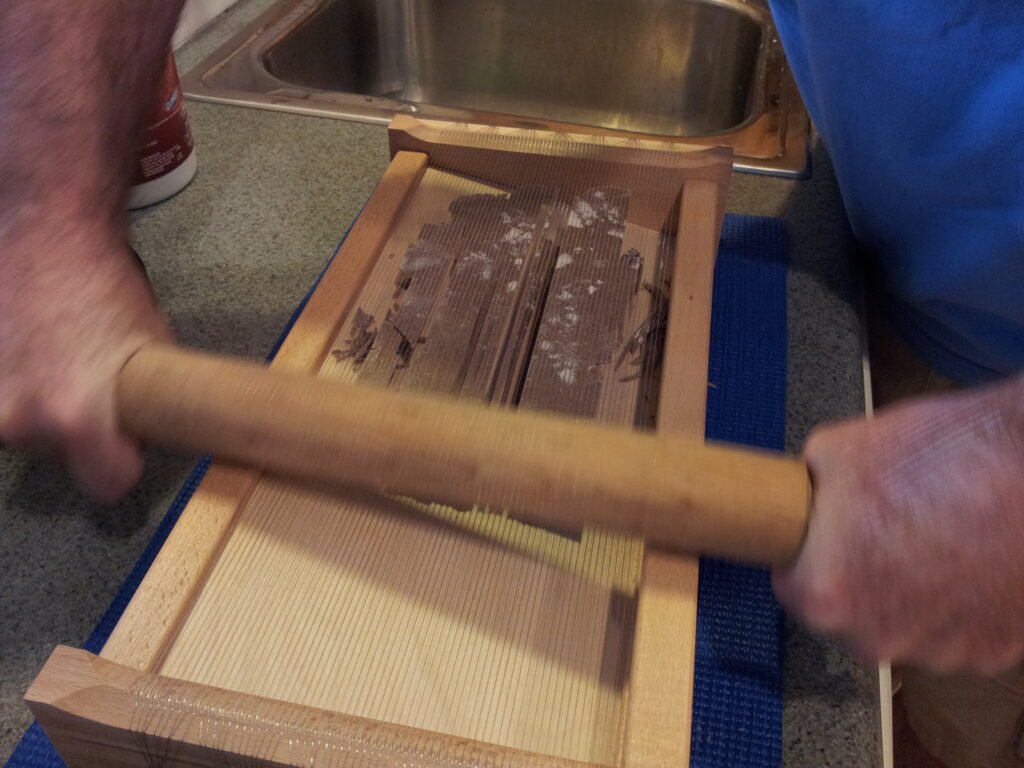
OK, this was an experiment. I’ve only made pasta from scratch twice before. Both times I followed the recipes on my New Years Day post. For some crazy reason, today we tried to use a different flour so we chose a buckwheat flour. I didn’t adjust the recipe and made it just as if it were regular white flour. After I got to the part that it was resting, I decided to search online for buckwheat noodles. Yikes, I thought – I quickly learned that buckwheat doesn’t have enough gluten to hold the pasta together. Everything I read explained why I had so much trouble with my dough. What happened was that it stayed very sticky like it was too moist but it was also very brittle and kept breaking, like it was too dry. What I learned was that you need to mix in some regular white flour to give it the gluten to give it strength and keep it from breaking up. It looks like a good ratio is 25% white flour and 75% buckwheat flour.

Buckwheat flour

Working with the dough was a challenge because it didn’t have the white flour added. When I try this again, I am going to follow the recipe at FXCuisine.com for Italian Alpine Buckwheat Pasta because it sounds really good.

This recipe gives you 5 to 6 servings. If you make more than you need, don’t worry. I’ve learned that you can freeze the extra and it will keep the fresh pasta taste and texture. Each time I have made past, I made extra and froze it because it is great for a fresh pasta experience in the middle of the week when you don’t have time to actually make fresh pasta. Keep this little tip in the back of your mind the next time you make fresh pasta.

Ingredients

  • 2 1/4 cups buckwheat flour
  • 3 eggs
  • 3/4 teaspoon salt
  • 1 tablespoon olive oil
  • 1 tablespoon lukewarm water

The basics of making pasta is actually pretty easy. Make your mound of dry ingredients and then build a well in the center where you put your eggs, olive oil and water. Gradually mix the flour into wet mixture. You’ll slowly run out of dry flour on the outside of the well. By this time, you need to keep mixing. I always find this point to be alarming because it doesn’t seem like it will actually mix together. In a sense, it seems too dry but then I keep mixing and suddenly, it comes together. This time, it stayed tacky but it didn’t feel too moist. I kneaded it for longer than I thought necessary and then decided to let rest and see what happens. I thought that if I kept kneading it, the pasta would firm up a bit and be less sticky. This didn’t happen, even after adding a little more flour.

Buckwheat dough resting

I let my dough rest for 30 minutes and then took it out to roll it. I pulled off about 1/4 of the dough and started to roll it. It was still pretty tacky and even with a dusting of flour, it didn’t want to roll out very well. I finally got this piece rolled out and started on the next piece. While I was rolling out the second piece, I decide to dust it with regular flour, this helped a little so I tried to incorporate it into the dough. This actually seemed to helped. I added about a tablespoon of regular flour into this fist-sized ball of dough. I then added regular four to the remaining dough, kneaded it some more, and let it rest again. At this point, I still had my original rolled out section so I decided to leave it as a comparison but I did give it a dusting of regular flour and let it sit out covered with a towel while I let the rest of the dough rest.

Rolled Dough

While all this dough was resting, I did a little more research online and came across Rustico Cooking. They have a post about using the chitarra and one of their suggestions is to let the dough dry a little after you’ve rolled it out. They suggested about 15 minutes but I went about 30 minutes. This did seem to help compared to previous attempts. The 30 minute wait time would probably be too long for standard pasta but I think it was good for the buckwheat pasta.

When I rolled out the remaining pasta, it was a little easier than the first section, but it was brittle and sticky. I just took my time and tried to roll out smaller sections at a time. I ended up with some scraps of rolled dough. We put it in a zip-lock bag and are freezing it. I don’t know what we’ll do with it but we’ll find something 🙂

We used our chitarra to cut the pasta. This fun little pasta cutter comes from the Abruzzo region of Italy. It makes a square shapes pasta and it’s probably the easiest cutter you can use.

Dough on Chitarra

Cutting the pasta on the chitarra

For dinner, we used the pasta from the first batch, that is the pasta that didn’t have any of the regular white flour added to it. It cooked up fine and had a earthy flavor. It wasn’t as creamy as when I have made the pasta with regular flour, but it went perfectly with the lentils. I will update this post once we use the noodles from the dough that had the white flour added. In the meantime, we put the pasta noodles into a zip-lock bag and stored it in the freezer.

Spicy Thai Sauce

Spicy Thai Pasta

It has been a while since I made a post. While most of my friends are enjoying the spring, I’ve been preparing tax returns. Yes, I am a CPA that specializes in tax. It’s a fun job except for all the IRS deadlines!

We came up with this sauce because we wanted to have a salad dressing that is similar to one we had at a friend’s house. They served us a kale salad with a spicy Thai dressing and it was really good. Tonight we decided to use some with a kale salad of our own. Our menu included grilled chicken breasts, pasta and salad. We used this sauce for our salad dressing and to toss our pasta. By the way, the pasta was some homemade pasta made on our chitarra.

Ingredients

INGREDIENTS

  • Juice of 1 lemon (about 3 table spoons)
  • 1 1/2 tablespoons of olive oil
  • 1 1/2 tablespoons of sesame oil
  • 3 teaspoons of sugar
  • 1 1/2 teaspoons of soy sauce
  • 3 cloves of garlic, minced
  • 1 1/2 tablespoons of Sriracha (or about 3/4 teaspoons of cayenne pepper powder)
  • 1 1/2 tablespoons of seasoned rice vinegar
  • zest of one lemon

For our salad, we used kale instead of lettuce. To this we added carrots, red onion, mushrooms, celery and julienned fresh turnips.

For our pasta, we used half thick past and half thin pasta. We ate this cold and dressed it with some of the Spicy Thai Sauce we made, we also added some olive oil, chopped peanuts, cilantro, and sliced jalapenos.  

Pasta & Lentils

Lentils are supposed to bring you good luck for the new year, according to Italian tradition. This tradition goes back a long time and it’s said the little bean’s shape signify coins – thus the association with prosperity for the coming year. I’ve never cooked them before so I was surprised at how easy they are to prepare. I am used to thicker beans that require long soaks to soften them.

For this New Years Eve dinner, I adapted a recipe I found in Breaking Bread in L’Aquila. This recipe comes from Santo Stefano di Sessanio. I didn’t intentionally change the recipe but I did change it because I didn’t have all the ingredients she calls for. Plus, the side note says you can make substitutions and the whole book is about home cooking and using what’s available.

Ingredients

  • 1 1/2 cup of dry lentils
  • 2 tablespoons of extra virgin olive oil
  • 4 ounces of pancetta (cut in 1/4 inch pieces)
  • 1 large onion, chopped. We used a large yellow onion
  • 1 clove of chopped garlic, finely chopped
  • 1 pound of spaghetti (I used our homemade pasta)
  • Salt & Pepper to taste
  • Fresh grated Parmigiano
  • 2 tablespoons finely chopped parsley for garnish

Instructions

Bring salted water to a boil in a medium sauce pan. Now, add the lentils, cover and cook over medium heat, stirring occasionally. Cook until the lentils are tender but not mushy. The official recipe says this should take about 20 minutes. Since I haven’t cooked them before, I did just as directed, however, my lentils were more on the mushy side so I will probably cut back on the time by a couple minutes. I think 17 to 18 minutes might have been best. Once cooked, drain the lentils and set aside.

Lentils boiling

Using a large pot, cook your pasta. I used the pasta we made on the chitarra but if you’re using packaged dry pasta, just follow the directions on the package. My pasta took longer than expected but it was kind of thick. Like, a .lot thicker than normal but we actually really liked it. Who knew it would make a difference?

Pasta

While you’re cooking your pasta, heat the olive oil in a medium sauce pan over medium-high heat. Add the pancetta, onions and garlic. Here’s where we differed. I used bacon because I didn’t have pancetta. Also, we didn’t have enough bacon but we had this with pork roast, so I used some of the drippings from the pork roast to add a meaty flavor. Cook this for about 7 to 10 minutes. I went until the onions were starting to get translucent. At this point, add the lentils, salt and pepper. Also, drain your pasta and reserve 1/4 cup of the water to add to the lentils to make them creamy. To be honest, I skipped the step of adding water because I thought it looked moist enough. Sprinkle with parmigiano and garnish with the parsley.

I wish I had taken a better picture of the final product, but to be honest, my household was too hungry to wait for another picture. I’ll try this recipe again and try to get some better pictures then.Lentils

Chitarra pasta cutter

Chitarra

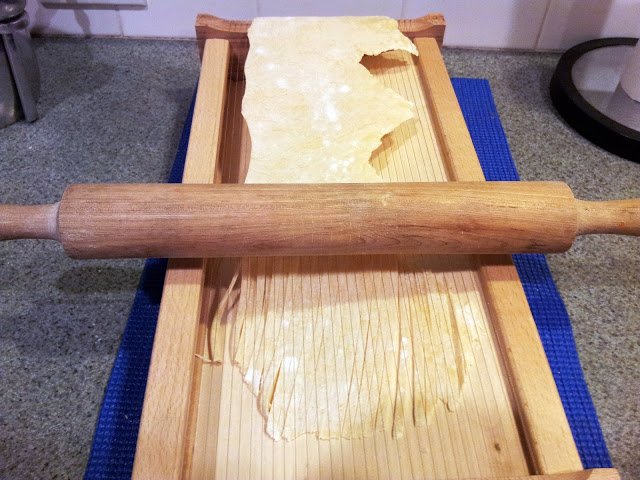
This is our new toy – a chitarra pasta cutter. This pasta cutting tool comes from Abruzzo, Italy. The device has strings on both sides, one side cuts thicker noodles and the second side cuts has thin noodles. Since this is our first attempt, I decided to use the thicker side. I started with the pasta that I prepared in the previous post for fresh pasta dough.

Rolled pasta

We cut this sheet of pasta into three wide strips that we put on the chitarra. It’s actually really simple to roll the pasta and gently push it through the wires. One thing to make sure is that the pasta dough has been floured on both sides to keep it from sticking together.

Pasta on chitarra

Once you lay it out, as shown above, take your rolling pin and gently roll it so the wires cut it into strips. You have to use a little force and sometime just use your fingers to get it to go all the way through.

Cutting the pasta

As you can see, my sheet of dough was longer than the chitarra. I just gently pulled the sheet towards me and kept rolling. The pasta just sort of folded over itself under the wires. The slot under the wires is slanted so once you’ve cut it, just tilt the chitarra and the pasta will fall out to the side.

Cut pasta on chitarra

Now that the pasta is cut, most people recommended to let it dry for a little while. Some say you can cook it immediately, but most of the things I ready suggested letting it dry and that this helps keep it from sticking to itself while it’s cooking. We don’t have a drying rack so we took a baking sheet and propped it up on the stove. Then we laid the pasta strips on the baking sheet and let them dry from about an hour. We’re putting this into a pasta and lentil dish for New Years Eve.

Cut pasta drying on the rack

Update – Since this was originally posted, we’ve purchased a pasta roller with a cutter attachment. Even though the roller has the cutter attachments, we still keep coming back to the chitarra. The pasta cut from the chitarra has a great size and we just think the chitarra is so easy and fun to use.

Fresh Pasta Dough

I’ve wanted to make fresh pasta for a long time. However, I was always intimidated by the thought of it and never knew what to do with it once I had it made. Well, for Christmas we got an Italian pasta cutter called a chitarra. It looks like a little harp and you lay the pasta sheets over the strings and then use a rolling pin to push it through the stings. One side makes a larger noodle, somewhere between spaghetti and linguine and the other side make a small noodle a little larger than angel hair.

So to start, there are tons of recipes online for homemade pasta dough. I read through many of them and they are all very similar – just slightly different amounts of flour, eggs, salt, olive oil and (sometimes) water. The one I settled on was from MangiaBenePasta.com and you can find various recipes from them at the link. I liked theirs the best because they give recipes for different quantities. The one I chose was for 3 to 4 servings. This made a manageable size of dough to work with for the first time. I did leave out the water from this recipe because some of the reviews on the chitarra state to use a denser pasta so it cuts easier.

INGREDIENTS

This recipe makes 3 to 4 servings (or two large man-sized servings)

  • 1 1/2 cups of flour (I used all purpose white flour)
  • 2 eggs
  • 1/2 teaspoon of salt
  • 3/4 teaspoon olive oil
  • 3/4 teaspoon luke-warm water

For a little bit larger amount of pasta, use this one for what they call 5 to 6 servings:

  • 2 1/4 cups of flour (I used all purpose white flour)
  • 3 eggs
  • 3/4 teaspoon of salt
  • 1 teaspoon olive oil
  • 1 teaspoon luke-warm water

Instructions

Pasta Dough Ingredients

Start by putting the flour in a mound on a clean dry space. I used our counter top but most recipes call for using a wood cutting board. Now, make a well in the middle of the flour. I started out using my fist but then the first egg took up the whole well so I had to enlarge it. Add the eggs, salt, water and olive oil to the middle of the well. Mix the eggs in the middle of the well with a fork and then slowly start incorporating the flour from the sides of the well. Eventually, you’ll run out of flour on the sides and by this time it is mixed enough to start using your hands to mix all the ingredients.

I was surprised that it was so dry at this point. I really started to think that I needed to add some water but I didn’t. I just kept mixing it with my hand and eventually it started to look like pasta dough. This just took a few minutes. At this point, start kneeding the dough to get it silky smooth. The recipe I used said you need to kneed for 10 minutes but I found that it took about 15 minutes of continuous kneeding to get it really smooth. I think this is something you get better at with more practice. I tried to follow the instructions I read online and really put my weight into it and the process seemed to go well.

Once it is kneeded to a smooth consistency and not sticky any more, you should roll it into a ball and let it rest. How long, you ask? Well, apparently, it all depends on who you ask! I followed their directions and covered it with a towel but I let it rest for an hour, rather than the 15 minutes they suggest. I also read that you can wrap it tightly in plastic wrap to let it rest. If this one doesn’t turn out good, I’ll try that method next time.

Pasta Dough Resting

Once the pasta has rested you need to roll it out. Most instructions say to get it to 1/16 inch. I am not sure I got mine that thin, but I just rolled and rolled and rolled until I felt it was enough.

Rolling the pasta dough

Here is a look at the final product. My dough is rolled out and ready to use. At this point, you can do anything you want with it. I am using my dough in the chitarra and will add that post later.

Rolled pasta