Pasta & Lentils

Lentils are supposed to bring you good luck for the new year, according to Italian tradition. This tradition goes back a long time and it’s said the little bean’s shape signify coins – thus the association with prosperity for the coming year. I’ve never cooked them before so I was surprised at how easy they are to prepare. I am used to thicker beans that require long soaks to soften them.

For this New Years Eve dinner, I adapted a recipe I found in Breaking Bread in L’Aquila. This recipe comes from Santo Stefano di Sessanio. I didn’t intentionally change the recipe but I did change it because I didn’t have all the ingredients she calls for. Plus, the side note says you can make substitutions and the whole book is about home cooking and using what’s available.

Ingredients

  • 1 1/2 cup of dry lentils
  • 2 tablespoons of extra virgin olive oil
  • 4 ounces of pancetta (cut in 1/4 inch pieces)
  • 1 large onion, chopped. We used a large yellow onion
  • 1 clove of chopped garlic, finely chopped
  • 1 pound of spaghetti (I used our homemade pasta)
  • Salt & Pepper to taste
  • Fresh grated Parmigiano
  • 2 tablespoons finely chopped parsley for garnish

Instructions

Bring salted water to a boil in a medium sauce pan. Now, add the lentils, cover and cook over medium heat, stirring occasionally. Cook until the lentils are tender but not mushy. The official recipe says this should take about 20 minutes. Since I haven’t cooked them before, I did just as directed, however, my lentils were more on the mushy side so I will probably cut back on the time by a couple minutes. I think 17 to 18 minutes might have been best. Once cooked, drain the lentils and set aside.

Lentils boiling

Using a large pot, cook your pasta. I used the pasta we made on the chitarra but if you’re using packaged dry pasta, just follow the directions on the package. My pasta took longer than expected but it was kind of thick. Like, a .lot thicker than normal but we actually really liked it. Who knew it would make a difference?

Pasta

While you’re cooking your pasta, heat the olive oil in a medium sauce pan over medium-high heat. Add the pancetta, onions and garlic. Here’s where we differed. I used bacon because I didn’t have pancetta. Also, we didn’t have enough bacon but we had this with pork roast, so I used some of the drippings from the pork roast to add a meaty flavor. Cook this for about 7 to 10 minutes. I went until the onions were starting to get translucent. At this point, add the lentils, salt and pepper. Also, drain your pasta and reserve 1/4 cup of the water to add to the lentils to make them creamy. To be honest, I skipped the step of adding water because I thought it looked moist enough. Sprinkle with parmigiano and garnish with the parsley.

I wish I had taken a better picture of the final product, but to be honest, my household was too hungry to wait for another picture. I’ll try this recipe again and try to get some better pictures then.Lentils

Advertisement

Chitarra pasta cutter

Chitarra

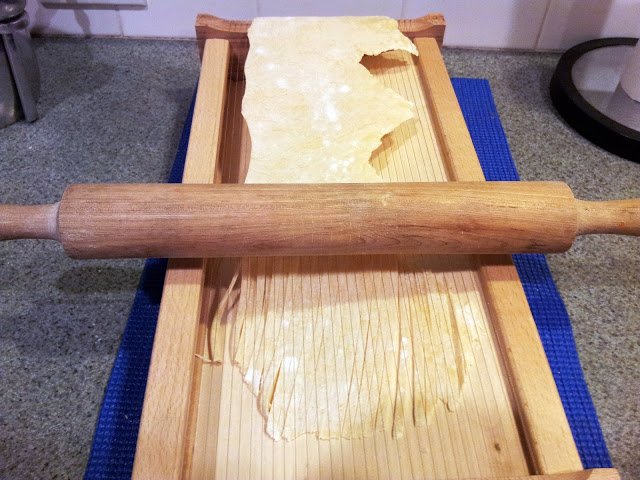
This is our new toy – a chitarra pasta cutter. This pasta cutting tool comes from Abruzzo, Italy. The device has strings on both sides, one side cuts thicker noodles and the second side cuts has thin noodles. Since this is our first attempt, I decided to use the thicker side. I started with the pasta that I prepared in the previous post for fresh pasta dough.

Rolled pasta

We cut this sheet of pasta into three wide strips that we put on the chitarra. It’s actually really simple to roll the pasta and gently push it through the wires. One thing to make sure is that the pasta dough has been floured on both sides to keep it from sticking together.

Pasta on chitarra

Once you lay it out, as shown above, take your rolling pin and gently roll it so the wires cut it into strips. You have to use a little force and sometime just use your fingers to get it to go all the way through.

Cutting the pasta

As you can see, my sheet of dough was longer than the chitarra. I just gently pulled the sheet towards me and kept rolling. The pasta just sort of folded over itself under the wires. The slot under the wires is slanted so once you’ve cut it, just tilt the chitarra and the pasta will fall out to the side.

Cut pasta on chitarra

Now that the pasta is cut, most people recommended to let it dry for a little while. Some say you can cook it immediately, but most of the things I ready suggested letting it dry and that this helps keep it from sticking to itself while it’s cooking. We don’t have a drying rack so we took a baking sheet and propped it up on the stove. Then we laid the pasta strips on the baking sheet and let them dry from about an hour. We’re putting this into a pasta and lentil dish for New Years Eve.

Cut pasta drying on the rack

Update – Since this was originally posted, we’ve purchased a pasta roller with a cutter attachment. Even though the roller has the cutter attachments, we still keep coming back to the chitarra. The pasta cut from the chitarra has a great size and we just think the chitarra is so easy and fun to use.

Fresh Pasta Dough

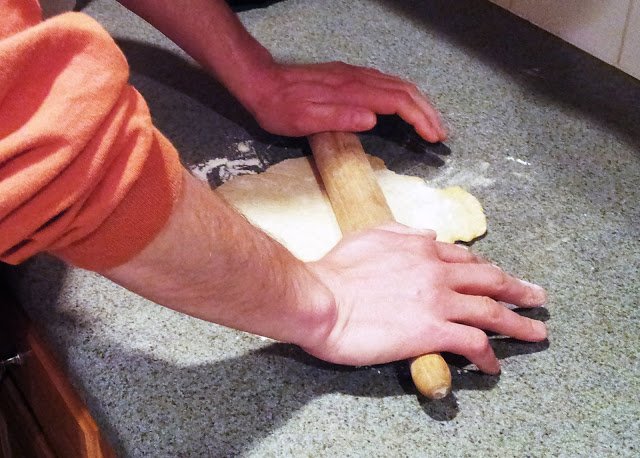
I’ve wanted to make fresh pasta for a long time. However, I was always intimidated by the thought of it and never knew what to do with it once I had it made. Well, for Christmas we got an Italian pasta cutter called a chitarra. It looks like a little harp and you lay the pasta sheets over the strings and then use a rolling pin to push it through the stings. One side makes a larger noodle, somewhere between spaghetti and linguine and the other side make a small noodle a little larger than angel hair.

So to start, there are tons of recipes online for homemade pasta dough. I read through many of them and they are all very similar – just slightly different amounts of flour, eggs, salt, olive oil and (sometimes) water. The one I settled on was from MangiaBenePasta.com and you can find various recipes from them at the link. I liked theirs the best because they give recipes for different quantities. The one I chose was for 3 to 4 servings. This made a manageable size of dough to work with for the first time. I did leave out the water from this recipe because some of the reviews on the chitarra state to use a denser pasta so it cuts easier.

INGREDIENTS

This recipe makes 3 to 4 servings (or two large man-sized servings)

  • 1 1/2 cups of flour (I used all purpose white flour)
  • 2 eggs
  • 1/2 teaspoon of salt
  • 3/4 teaspoon olive oil
  • 3/4 teaspoon luke-warm water

For a little bit larger amount of pasta, use this one for what they call 5 to 6 servings:

  • 2 1/4 cups of flour (I used all purpose white flour)
  • 3 eggs
  • 3/4 teaspoon of salt
  • 1 teaspoon olive oil
  • 1 teaspoon luke-warm water

Instructions

Pasta Dough Ingredients

Start by putting the flour in a mound on a clean dry space. I used our counter top but most recipes call for using a wood cutting board. Now, make a well in the middle of the flour. I started out using my fist but then the first egg took up the whole well so I had to enlarge it. Add the eggs, salt, water and olive oil to the middle of the well. Mix the eggs in the middle of the well with a fork and then slowly start incorporating the flour from the sides of the well. Eventually, you’ll run out of flour on the sides and by this time it is mixed enough to start using your hands to mix all the ingredients.

I was surprised that it was so dry at this point. I really started to think that I needed to add some water but I didn’t. I just kept mixing it with my hand and eventually it started to look like pasta dough. This just took a few minutes. At this point, start kneeding the dough to get it silky smooth. The recipe I used said you need to kneed for 10 minutes but I found that it took about 15 minutes of continuous kneeding to get it really smooth. I think this is something you get better at with more practice. I tried to follow the instructions I read online and really put my weight into it and the process seemed to go well.

Once it is kneeded to a smooth consistency and not sticky any more, you should roll it into a ball and let it rest. How long, you ask? Well, apparently, it all depends on who you ask! I followed their directions and covered it with a towel but I let it rest for an hour, rather than the 15 minutes they suggest. I also read that you can wrap it tightly in plastic wrap to let it rest. If this one doesn’t turn out good, I’ll try that method next time.

Pasta Dough Resting

Once the pasta has rested you need to roll it out. Most instructions say to get it to 1/16 inch. I am not sure I got mine that thin, but I just rolled and rolled and rolled until I felt it was enough.

Rolling the pasta dough

Here is a look at the final product. My dough is rolled out and ready to use. At this point, you can do anything you want with it. I am using my dough in the chitarra and will add that post later.

Rolled pasta