Homemade Pasta with Goose Eggs

Here is our story about our experience comparing semolina flour versus all-purpose flour when making homemade pasta using goose eggs.

It all started a couple weeks ago when we went to dinner with some friends and one of them had just bought some goose eggs from a local farmer. We all decided it would be fun to have a dinner party and everyone pitch in to make pasta. We had this dinner last Sunday and it was a fun evening of wine, pasta, and good company.

Last Sunday, Steve used a recipe he found online that used a combination of goose eggs and chicken eggs. His recipe also called for a mixture of semolina flour and all-purpose flour. I can’t find the recipe he used but it had all the elements of a standard pasta recipe: eggs, flour, salt, olive oil and water. When the dinner was over, Steve sent us home with some goose eggs so we could try them out ourselves.

Since we had never used semolina before, we picked some up at the grocery store so we could try using it in our own pasta. Yesterday we decided to make two batches of pasta to compare using the different flours in our pasta. The first batch is using a goose egg with semolina flour and the second batch is using one goose egg with all-purpose flour. We really are just doing this so we can do a side-by-side comparison of the two flours.

Something to know about goose eggs is that they are very large and have large, bright yellow yokes. The ones we got seem to be about the size or 2 or 3 chicken eggs. We had to compensate a little with the flour quantity to get the right texture for the dough but we’ve made enough dough to be able to do so without much trouble.

Pasta from Semolina Flour and Goose egg:

For the first batch of pasta, we used Bob’s Red Mill Semolina Pasta Flour that we bought at our local grocery store. If you can’t find it in your store, you can buy some online. Since we hadn’t made any pasta like this before, we used the recipe on the package.

Ingredients

  • 1 1/2 cup of semolina flour
  • 1/2 teaspoon salt
  • 2 eggs (we substituted 1 goose egg)
  • 2 tablespoons water
  • 2 tablespoons olive oil

Pasta from All-Purpose Flour and Goose Egg:

For this batch, we used regular all-purpose flour but we didn’t have a recipe to use for comparison. I went with a recipe from one of my favorite TV Chefs,  Lidia Bastianich. The proportions are slightly different, but basically the same recipe.

Ingredients

  • 2 cups all-purpose flour
  • 1/2 teaspoon of salt
  • 2 large eggs (we substituted one goose egg)
  • 1/4 cup olive oil
  • 3 tablespoons of cold water

Instructions for both pasta recipes

Since we wanted to compare the two flours, we used the same mixing process.

Combine the flour and salt in a large bowl. In a second bowl, add the egg and beat it to mix it up then add the water and olive oil. Next, add the egg, water, and olive oil mixture to the semolina flour and salt. Mix in the bowl until you have a stiff dough. Then move it onto a floured counter top and knead the dough for 10 minutes. Then, put the dough into a zip-lock bag and allow it to rest for at least 20 minutes.

After resting the past, we used our pasta roller to get down to the 2nd thinnest setting and then used the linguine cutter on the pasta roller to cut the pasta in a consistent manner.

Summary of our comparison:

We really wanted to taste a difference in the two pastas, however, we really didn’t taste a difference. There was a slight textural difference but I don’t think it was enough that I would have noticed it.

  • When we were mixing the pasta and kneading it, the semolina mixture was grittier and stickier so I was a little concerned. The all-purpose flour mixture was very silky and smooth and seemed like it was exactly what you wanted.
  • However, after resting, the texture was reversed and the semolina was not near as sticky and it went through the pasta roller without any trouble. The all-purpose flour had become stickier and we to add some flour to keep it from sticking to the pasta roller as it went through.
  • Cooking the pasta seemed to be identical in time needed to cook them. We cooked it in small batches for about 3 minutes per batch.
  • The taste of the final pasta really was indistinguishable. I couldn’t tell a difference when it came to taste.
  • The final texture is where we saw the biggest difference. Even though we rolled both pasta mixtures the same way and to the same setting, however, the semolina flour seemed thicker, even though it should have been exactly the same thickness. Once cooked, it held onto the seemingly thicker status and seemed more substantial and toothsome. The semolina pasta also seemed more structurally stable. However, I don’t think it was enough to have noticed if you weren’t intentionally doing a side-by-side comparison.
  • I would like to try this comparison again using regular store bought chicken eggs just to see if it was goose eggs that made the difference.

Here is Ryder checking out the pasta as it was resting.

Ryder checking out our rolled pasta

Ryder checking out our rolled pasta

Just for fun, here are some pictures from our first experiment using the goose eggs last weekend. This first picture is one goose egg in a bowl. You can see the two chicken eggs in the background for a comparison of the size.

Goose egg in a bowl

Goose egg in a bowl

Here is a picture of the bowl with 2 goose eggs (on the left side) and 2 chicken eggs (on the right side).

Mixing bowl with 2 goose eggs and 2 chicken eggs

Mixing bowl with 2 goose eggs and 2 chicken eggs

Here is one of us using the chitarra to cut the past.

Here we are using the chitarra to cut the pasta.

Here we are using the chitarra to cut the pasta.

This is Curt breaking open the first goose egg. You can tell by his voice that he was surprised at the size of this egg.

Finally, here is a clip of Steve using the chitarra for the first time.

Advertisement

Buckwheat Pasta on the Chitarra

Buckwheat pasta

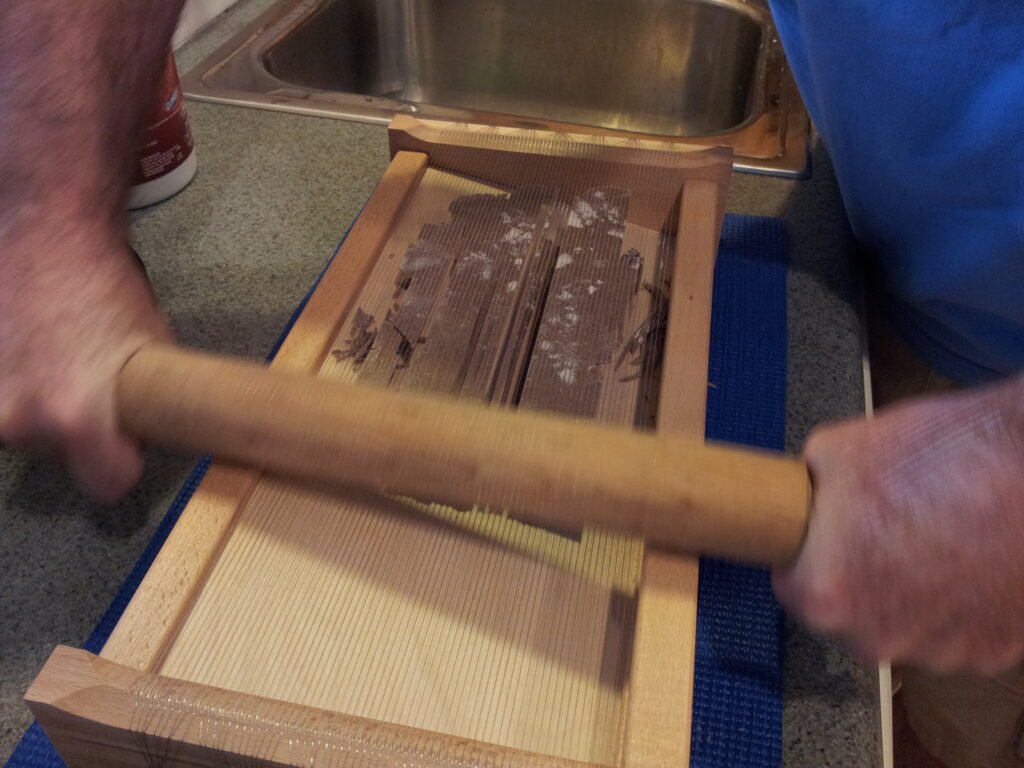
OK, this was an experiment. I’ve only made pasta from scratch twice before. Both times I followed the recipes on my New Years Day post. For some crazy reason, today we tried to use a different flour so we chose a buckwheat flour. I didn’t adjust the recipe and made it just as if it were regular white flour. After I got to the part that it was resting, I decided to search online for buckwheat noodles. Yikes, I thought – I quickly learned that buckwheat doesn’t have enough gluten to hold the pasta together. Everything I read explained why I had so much trouble with my dough. What happened was that it stayed very sticky like it was too moist but it was also very brittle and kept breaking, like it was too dry. What I learned was that you need to mix in some regular white flour to give it the gluten to give it strength and keep it from breaking up. It looks like a good ratio is 25% white flour and 75% buckwheat flour.

Buckwheat flour

Working with the dough was a challenge because it didn’t have the white flour added. When I try this again, I am going to follow the recipe at FXCuisine.com for Italian Alpine Buckwheat Pasta because it sounds really good.

This recipe gives you 5 to 6 servings. If you make more than you need, don’t worry. I’ve learned that you can freeze the extra and it will keep the fresh pasta taste and texture. Each time I have made past, I made extra and froze it because it is great for a fresh pasta experience in the middle of the week when you don’t have time to actually make fresh pasta. Keep this little tip in the back of your mind the next time you make fresh pasta.

Ingredients

  • 2 1/4 cups buckwheat flour
  • 3 eggs
  • 3/4 teaspoon salt
  • 1 tablespoon olive oil
  • 1 tablespoon lukewarm water

The basics of making pasta is actually pretty easy. Make your mound of dry ingredients and then build a well in the center where you put your eggs, olive oil and water. Gradually mix the flour into wet mixture. You’ll slowly run out of dry flour on the outside of the well. By this time, you need to keep mixing. I always find this point to be alarming because it doesn’t seem like it will actually mix together. In a sense, it seems too dry but then I keep mixing and suddenly, it comes together. This time, it stayed tacky but it didn’t feel too moist. I kneaded it for longer than I thought necessary and then decided to let rest and see what happens. I thought that if I kept kneading it, the pasta would firm up a bit and be less sticky. This didn’t happen, even after adding a little more flour.

Buckwheat dough resting

I let my dough rest for 30 minutes and then took it out to roll it. I pulled off about 1/4 of the dough and started to roll it. It was still pretty tacky and even with a dusting of flour, it didn’t want to roll out very well. I finally got this piece rolled out and started on the next piece. While I was rolling out the second piece, I decide to dust it with regular flour, this helped a little so I tried to incorporate it into the dough. This actually seemed to helped. I added about a tablespoon of regular flour into this fist-sized ball of dough. I then added regular four to the remaining dough, kneaded it some more, and let it rest again. At this point, I still had my original rolled out section so I decided to leave it as a comparison but I did give it a dusting of regular flour and let it sit out covered with a towel while I let the rest of the dough rest.

Rolled Dough

While all this dough was resting, I did a little more research online and came across Rustico Cooking. They have a post about using the chitarra and one of their suggestions is to let the dough dry a little after you’ve rolled it out. They suggested about 15 minutes but I went about 30 minutes. This did seem to help compared to previous attempts. The 30 minute wait time would probably be too long for standard pasta but I think it was good for the buckwheat pasta.

When I rolled out the remaining pasta, it was a little easier than the first section, but it was brittle and sticky. I just took my time and tried to roll out smaller sections at a time. I ended up with some scraps of rolled dough. We put it in a zip-lock bag and are freezing it. I don’t know what we’ll do with it but we’ll find something 🙂

We used our chitarra to cut the pasta. This fun little pasta cutter comes from the Abruzzo region of Italy. It makes a square shapes pasta and it’s probably the easiest cutter you can use.

Dough on Chitarra

Cutting the pasta on the chitarra

For dinner, we used the pasta from the first batch, that is the pasta that didn’t have any of the regular white flour added to it. It cooked up fine and had a earthy flavor. It wasn’t as creamy as when I have made the pasta with regular flour, but it went perfectly with the lentils. I will update this post once we use the noodles from the dough that had the white flour added. In the meantime, we put the pasta noodles into a zip-lock bag and stored it in the freezer.

Chitarra pasta cutter

Chitarra

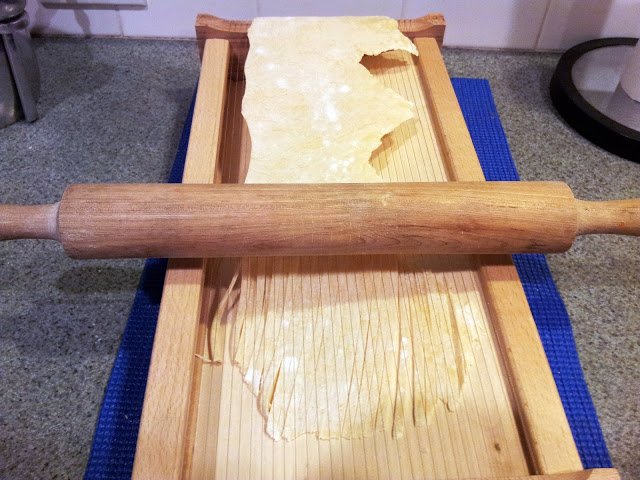
This is our new toy – a chitarra pasta cutter. This pasta cutting tool comes from Abruzzo, Italy. The device has strings on both sides, one side cuts thicker noodles and the second side cuts has thin noodles. Since this is our first attempt, I decided to use the thicker side. I started with the pasta that I prepared in the previous post for fresh pasta dough.

Rolled pasta

We cut this sheet of pasta into three wide strips that we put on the chitarra. It’s actually really simple to roll the pasta and gently push it through the wires. One thing to make sure is that the pasta dough has been floured on both sides to keep it from sticking together.

Pasta on chitarra

Once you lay it out, as shown above, take your rolling pin and gently roll it so the wires cut it into strips. You have to use a little force and sometime just use your fingers to get it to go all the way through.

Cutting the pasta

As you can see, my sheet of dough was longer than the chitarra. I just gently pulled the sheet towards me and kept rolling. The pasta just sort of folded over itself under the wires. The slot under the wires is slanted so once you’ve cut it, just tilt the chitarra and the pasta will fall out to the side.

Cut pasta on chitarra

Now that the pasta is cut, most people recommended to let it dry for a little while. Some say you can cook it immediately, but most of the things I ready suggested letting it dry and that this helps keep it from sticking to itself while it’s cooking. We don’t have a drying rack so we took a baking sheet and propped it up on the stove. Then we laid the pasta strips on the baking sheet and let them dry from about an hour. We’re putting this into a pasta and lentil dish for New Years Eve.

Cut pasta drying on the rack

Update – Since this was originally posted, we’ve purchased a pasta roller with a cutter attachment. Even though the roller has the cutter attachments, we still keep coming back to the chitarra. The pasta cut from the chitarra has a great size and we just think the chitarra is so easy and fun to use.