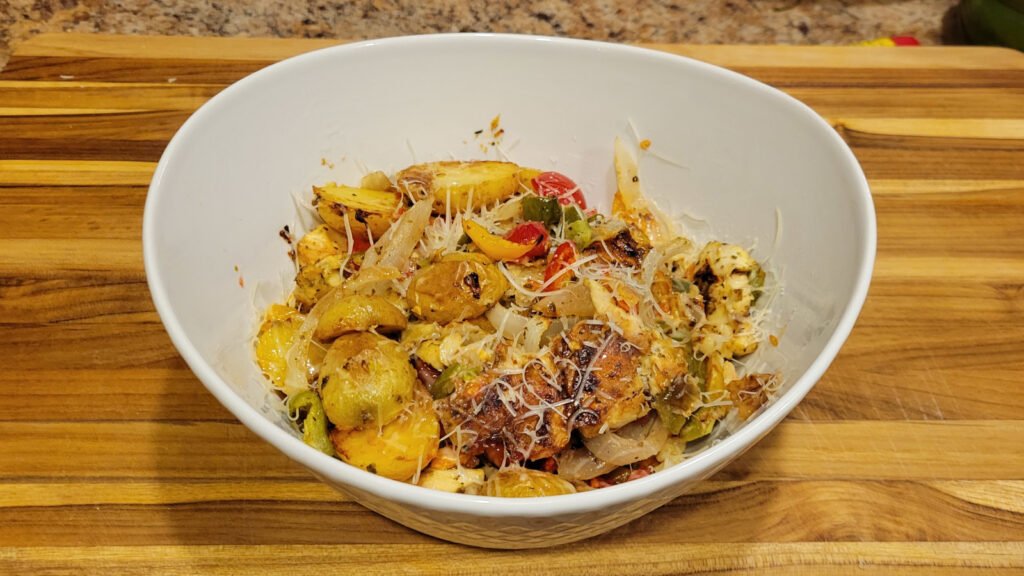
Pizza with Smoked Chicken and Italabama White BBQ Sauce

Yep, it’s another pizza recipe. This time we tried out a new sauce called White BBQ Sauce and is sometimes referred to Alabama White Sauce. It’s a mayonnaise based sauce that is used on chicken and seafood, and as a general condiment. This one has been modified for a pizza sauce, hence the Italabama name.

We found this sauce because we were looking for a creative way to use some smoked chicken on a pizza. We kind of used this one as our inspiration but tweaked it for our use. Mostly, we wanted it spicier, so we pulled in some elements from other recipes we found online. I will point out, most recipes have more liquid and don’t use the herbs.

The sauce recipe will make enough for a 16 inch pizza plus have some left over to dip your pizza into (instead of ranch) and you can use the leftover as a spread on sandwiches.


For the Italabama White Sauce:

Ingredients

  • 1 cup Mayonnaise
  • 1/2 teaspoon salt
  • 1 teaspoon black pepper
  • 1 teaspoon dried parsley
  • 1 teaspoon dried basil
  • 1 teaspoon dried oregano
  • 1 teaspoon garlic powder
  • 1 teaspoon lemon juice
  • 1 teaspoon ground horseradish (or 2 tsp prepared)
  • 1 teaspoon cayenne (less for milder heat)
  • 4 tablespoons grated parmesan cheese
  • 2 tablespoons white wine vinegar
  • 1 teaspoon granulated sugar

Directions

OK, this is the simple part. Just whisk all the sauce ingredients together until smooth. We made ours a few hours ahead of time and let it rest in the refrigerator to give it some time for the flavors to meld.


For the pizza:

Ingredients

  • Pizza dough (we used Lidia’s Pizza Dough recipe for ours)
  • Italabama White BBQ Sauce (see above)
  • 2 cups of chopped smoked chicken (you can also use grilled chicken)
  • 1/2 cup sliced sweet onion
  • 1 cup mozzarella cheese
  • Red pepper flakes (optional)

Directions

Stretch your pizza dough into a 16 inch circle

Spread the sauce over the pizza dough. Leave about a 1/2 inch ring on the outside border of the pizza dough. This will create a better crust.

Spread the chicken, onion and mozzarella around the top of the pizza. Sprinkle with red pepper flakes if you want to give it that extra little kick.

The recipe we found as our inspiration called for 1 cup of cherry tomatoes to be topped on the pizza. They also suggested an option of topping it with chopped fresh basil when you pull it out of the over. I think these would be good additions, but they are definitely not necessary. To me, the sauce and the chicken were the star of the night.

Advertisement

Lasagna Bianca – White Lasagna with Spinach & Matzo crackers

I will admit, a lasagna made with matzo crackers had me a little skeptical but I was proved wrong. It turned out great. Substituting the lasagna noodles with matzo crackers gives it a similar texture and a little different flavor, but in a good way.

Our lasagna bianca just after we pulled it out of the oven.

Ingredients

the spinach sauce

  • 1 medium yellow onion, diced
  • 3 cloves of garlic, minced
  • 2 teaspoons olive oil
  • 1/2 cup butter
  • 1/4 cup all-purpose flour
  • 2 1/2 cups of whole milk
  • 3/4 cup Parmesan cheese, grated
  • 2 cups frozen spinach, chopped or 1 can of spinach, chopped

The White Sauce

  • 1 container ricotta cheese (32 oz)
  • 1 large egg
  • 1 teaspoon nutmeg, ground
  • 2 teaspoons salt
  • 2 teaspoons freshly ground black pepper

Everything Else

  • Matzo crackers, lightly salted
  • 1 lb ground hot Italian sausage
  • 1 tablespoon of crushed red pepper flakes
  • 1/2 cup mozzarella cheese, shredded
  • 1/2 cup whole milk

Instructions

Preheat your oven to 350 F.

Make the spinach sauce:

  1. In a large pot, combine the butter and olive oil on medium heat until melted. Add the chopped onions and garlic and sauté until they are translucent and fragrant.
  2. Add the flour and whisk until it is all incorporated. Cook this mixture on medium heat for about 5 minutes. Stir this béchamel mixture frequently.
  3. Add the 2 1/2 cups of whole milk and whisk until combined. Cook for 5 minutes, stirring frequently until the mixture has thickened.
  4. Stir in the Parmesan cheese and spinach into the white sauce. Heat this on low. If you are using frozen spinach, heat until the spinach is warm and fully defrosted. Add salt and pepper to taste.
  5. Allow to cool before assembling the lasagna.

Make the white sauce

  1. In a separate bowl, add the ricotta cheese, egg, nutmeg, and salt and pepper. Whisk this together.

Brown the hot Italian sausage

  1. If you have sausage links, remove the casings.
  2. Heat a pan over medium heat. Once hot, put the sausage in the pan.
  3. Break the sausage apart with a spatula to get it into as many pieces as possible.
  4. Stir occasionally as it browns. Reduce the heat if it’s browning too quickly. This should take 8 to 10 minutes.
  5. Let cool before assembling the lasagna.

Assemble the lasagna

  1. Add a thin layer of the spinach sauce to the bottom of a 9 x 13 inch casserole dish.
  2. Add a layer of matzo crackers. You can break the crackers as needed to make a full layer.
  3. Add 1/2 cup of the ricotta cheese mixture on top of the matzo cracker layer. Spread this out evenly.
  4. Add a layer of the browned ground Italian sausage.
  5. Sprinkle a think layer of crushed red pepper flakes.
  6. Repeat with additional layers of spinach sauce, matzo crackers, ricotta cheese sauce, sausage, and red pepper flakes.
  7. Once you reach the top of your dish (or run out of ingredients for layers) pour on the 1/2 cup of whole milk across the top, then cover with mozzarella cheese. The milk helps add moisture for the matzo crackers to absorb.
  8. Cover the dish with foil and place it on a baking sheet (in case it flows over). Bake for 45 minutes or until bubbly.
  9. Remove the foil and allow the top to brown for an additional 15 minutes.

Variations

This recipe was inspired by a number of online recipes we found, but mostly by one of my favorite sites, The Spruce Eats. They have some variations that include other vegetables and other cheeses. They also suggest using store bought Alfredo if you’re short on time or use marinara if you want a more traditional red lasagna.

We added the nutmeg to the ricotta sauce and the sausage and red pepper flakes that weren’t in the original recipe. You could make this without the sausage or you can also use other sausages, like a breakfast sausage or even ground beef.

Italian Wedding Soup

We found this recipe a couple of years ago on the back of a box of pasta at the City Market grocery store in Breckenridge, CO. There are a bunch of variations online, but this one is really simple and we use it as the base for our variations.

Options:
• If you make broth from your Thanksgiving Turkey, this is a perfect use for that broth. 
• If you’re using sausage and in a rush, you can slice the sausage into thin slices. It’s not traditional but it gets the same flavor.
• If you’re like us and make large batches of Italian Meatballs, you can use your leftovers in this recipe instead of the sausage. Just cut large meatballs down into 1/2 inch pieces.
• We found a recipe that includes cherry tomatoes. We add those, too, from time to time because we like the extra flavor, even though it’s not traditional.

A picture of a cutting board and ingredients for Italian Wedding Soup.
Preparing Italian Wedding Soup

Ingredients

  • 2 tablespoons Olive Oil
  • 1 cup onion, chopped
  • 1 cup carrot, chopped
  • 1/2 cup celery chopped
  • 1 tablespoon garlic, chopped
  • 4 cups chicken broth (use fresh if you have it)
  • 1 teaspoon red pepper flakes (optional)
  • 1 lb Italian Sausage (or your favorite sausage) or Italian meatballs
  • 1 cup Acini de Pepe pasta
  • 1/2 cup cherry tomatoes, cut into halves (optional)
  • 3 cups of baby spinach or kale (or a mix of both)
  • 2 tablespoons parsley, chopped (for garnish)
  • Salt & pepper for taste
A picture of Italian Wedding Soup cooking
Italian Wedding Soup

Directions

  1. Prep your vegetables.
    Heat the olive oil in a pot over medium heat. Add the onion, carrots, and celery. Saute for 4 minutes, of until they are starting to soften. Add the garlic and saute for a couple more minutes.
  2. Add the chicken broth and red pepper flakes (optional) and bring it to a boil.
  3. Roll the sausage meat into 1/2 inch meatballs. or cut it into small slices. If you’re using traditional meatballs, cut them into halves or quarters so they are about 1/2 inch.
  4. Add the meatballs to the soup and simmer for 4 minutes, or until the meatballs are cooked through. 
  5. Add the baby spinach or kale, and the acini di pepe pasta and cherry tomatoes (optional) and simmer for 7 more minutes. Add salt & pepper to taste.
  6. Serve up in large bowls. Add the chopped parsley as a garnish on the soup.

Marinated Mushrooms

Here is our jar of marinated mushrooms. You can see buts of the garlic, rosemary, red pepper flakes and orange peel floating in there with the mushrooms.

Here is our jar of marinated mushrooms. You can see buts of the garlic, rosemary, red pepper flakes and orange peel floating in there with the mushrooms.

We saw this recipe on one of Lidia Bastianich’s shows on CreateTV. It sounded simple enough and we have some extra mushrooms leftover from the Christmas holiday cooking. We were surprised at how much a pound of mushrooms cooked down so next time we’re going to double the recipe.

The orange peel really adds a nice flavor to the mushrooms and was a pleasant surprise. There is a lot of liquid left over from the vinegar that the mushrooms are cooked and stored in that has a really good mushroom flavor. We’re going to try to re-purpose this into a salad dressing or something like that.

Ingredients

  • 1 1/4 cups of white wine vinegar
  • 1 cup water
  • 2 sprigs of fresh rosemary
  • 2 bay leaves (fresh if you have them available)
  • 2 teaspoons of kosher salt
  • 1/2 to 1 teaspoon of crushed red pepper (depending on your preferred heat level)
  • 1 pound of small white button mushrooms, cleaned and trimmed
  • 4 cloves of garlic, crushed and peeled
  • Peel of 1 orange (peeled with a vegetable peeler)
  • Extra-Virgin olive oil (for tossing)
  • 2 tablespoons chopped Italian Parsley

Instructions

Using a large sauce pan or dutch oven, combine the vinegar, water, rosemary, bay leaves, salt, and red pepper flakes. Bring this mixture to a boil.

while the mixture is coming to a boil, prepare your mushrooms. The goal is to have them be bite-sized, so smaller is best. For any larger mushrooms, cut in half or into quarters.

Once the mixture is boiling, add your mushrooms and reduce the heat to a simmer. Cover the mushrooms and cook for about 5 minutes, until the mushrooms are tender.

Remove the pan from the heat and then add the garlic and orange peel. Allow the mixture to cool in the cooking liquid.

Once cooled, pack the mushrooms into a jar and then pour the cooking liquid over them. Seal the jar and refrigerate. We ate ours after about 4 hours of refrigeration and they were great. You can keep them in the refrigerator for up to a week.

When you’re ready to eat, serve them by placing the mushrooms into a serving bowl and drizzle with the olive oil and sprinkle with parsley.

Here are our mushrooms after we drizzled with olive oil and sprinkled with parsley. They were eaten too fast so I couldn't get a picture of them in a nice clean serving bowl.

Here are our mushrooms after we drizzled with olive oil and sprinkled with parsley. They were eaten too fast so I couldn’t get a picture of them in a nice clean serving bowl.

Smoked Jalapeño Sauce

This sauce came about because we wanted to find a way to use some fajita ingredients with pasta. A really good friend gave us a huge basket of jalapeño peppers from her garden and we used these in the smoker. We’ve been making a Doña sauce for years and this is a variation of the Smoked Doña Sauce. The primary difference is the sauce we made tonight wasn’t intended to be used like a salsa, it’s more a base for something else. It’s definitely much spicier and intense than the doña sauces.

Smoked Jalapeno Sauce being mixed in the blender.

Smoked Jalapeno Sauce being mixed in the blender.

Ingredients

  • 1 lb of fresh red ripened jalapeños,
  • 6 cloves of garlic,
  • 1/4 cup evoo.
  • 2 cups water
  • 1 teaspoon kosher salt

Instructions

  1. Smoke the jalapeño peppers (See smoking instructions here)
  2. Blanch the peppers and garlic in 2 cups of water for 20 mins
  3. Put everything in a blender and process until smooth, adding a teaspoon of kosher salt.

Makes a spectacular dipping sauce and base for a pasta dish! We mixed it tomato sauce then added it to pasta, fajita beef and grilled vegetables – it’s definitely worth a try!

Here are some pictures of the process:

Jalapenos being put into the smoker.

Jalapenos being put into the smoker.

Jalapenos after they have been smoked.

Jalapenos after they have been smoked.


Fajita pasta with smoked jalapeno sauce.

Fajita pasta with smoked jalapeno sauce.

Smoked Jalapeno Sauce being mixed in the blender.

Smoked Jalapeno Sauce being mixed in the blender.

Piselli e Guanciale – Peas and Bacon

Piselli e guanciale, otherwise known as peas and bacon.

Piselli e guanciale, otherwise known as peas and bacon.

This is another gem of a recipe that comes from my favorite cookbook, Breaking Bread in L’Aquila. We modified this one to substitute bacon and changed the cooking order so that the bacon and tomatoes stay firm.

One of the best parts of this recipe is that it is so simple. We can’t find fresh peas here in Austin, TX, so we always go with the frozen peas. As for the protein, we go with bacon. I mean, who doesn’t like bacon. I know guanciale isn’t the same as bacon but it’s the closest you can find here in Austin. We also found that adding the bacon at the end gives a crispier bacon which gives a nice texture since the rest of the dish is so soft.

We made this batch for a Sunday dinner with friends where we made pasta and mixed the piselli e guanciale with the pasta.

This should serve 6 – 8 people.

Ingredients

  • 2 to 3 tablespoons extra virgin olive oil
  • 4 ounces of bacon (or guanciale), chopped
  • 2 medium onions, chopped
  • 1 pound of peas, frozen or fresh
  • 2 medium tomatoes, chopped
  • Salt & fresh ground pepper, to taste

Instructions

Start by cooking the chopped bacon in a frying pan. Once it is fully cooked, remove the bacon but leave the oil in the pan. Add your chopped onion to the frying pan with the bacon grease. If you need extra liquid, add the olive oil. You only need the olive oil if you don’t have enough bacon grease to use for your sauted onions. Heat the frying pan with the bacon grease and olive oil over medium-high heat. Once it’s heated, add the onion and saute until the onion starts to turn translucent. This should take about 5 minutes.

Stir the peas into the sauted onions. Continue cooking for 5 to 7 minutes, or until the peas are warmed and still plump. Now, add the cooked chopped bacon and the tomatoes and mix together. Taste the dish and then season with salt and pepper, to taste.

Serve warm as a side dish. Alternatively, you can use this mixture as a topping for pasta as a main course.


Sunday Gravy, Ragu or Italian Meat Sauce

Sunday Gravy versus just a regular meat sauce? Maybe it’s a ragu? To be honest, I’m not a purist who knows the difference. I seem to have a hard time figuring out what each one is and I see contradictory information everywhere. Maybe it’s a regional dialect rather than different recipes/dishes. Regardless of what you call it, I do appreciate a meaty tomato sauce that is allowed to simmer for hours on the stove. Today we decided to make some pasta and a meat sauce for our Sunday dinner. I started looking online for some recipe inspiration and found a lot of recipes, but they were all mostly the same. To my surprise, the ones that claimed to be the most authentic were the ones that are the most similar to the sauce my dad used to make. When I was a kid, we simply called it “spaghetti,” which I always thought was the name of the dish, not just the name of the noodle. I guess he inherited it from his mother and it is the only food dish I remember him preparing. Everything else he “made” for dinner involved a telephone or a microwave. I do remember that my dad’s spaghetti came with a meat sauce, which I preferred over my uncle’s spaghetti that was served with meatballs. Apparently there was a minor rivalry between the two of them as to which version was best and authentic.

For those of you who don’t know, my dad was “mostly” Italian. His mom was born in the US a few years after her parents came over from Abruzzo. His dad was German and French but for various reasons, he never connected with that side of his family. In terms of what he considered his ethnicity, he always seems to think of himself as Italian-American, even though we did get stuck with a German last name.

For this sauce today, I used a blend of recipes that I found that reminded me the most of the sauce I knew as a kid. The first recipe I used as a base is from the blog “A table for two” titled “Great Grandma’s Pasta Sauce” and Julie gives a great narrative of how she came upon this recipe from her Italian husband. The other recipe comes from the book “Breaking Bread in L’Aquila” by Maria Filice. This is my go-to book for authentic Abruzzese recipes. I’ve mentioned her book before and I highly recommend it for traditional Italian cooking.

Ingredients

  • 2 tablespoons olive oil
  • 1 yellow onion, chopped
  • 4 cloves of garlic, chopped (or more if you’re like me)
  • 1 carrot, finely diced
  • 1 and 1/2 pounds ground beef
  • 2 35-oz cans of crushed or diced tomatoes
  • 1 6-oz can of tomato paste
  • 1 handful of fresh basil, chopped, or 2 tablespoons dried basil
  • 1 teaspoon of red pepper flakes (for mild) or 1 tablespoon for spicy
  • 1 tablespoon of crushed oregano
  • Salt and pepper, to taste

Instructions

Garlic & OnionHeat a dutch over or large sauce pan over medium heat. Then, add the olive oil and heat it. Then, add the onion, garlic and carrot. Cook this mixture (a variation of a soffritto that we use all the time) for a couple minutes and then add the meat. Cook this until the meat is fully cooked and the onions are translucent. This will take about 10 minutes.

Ground beef cooking

Now, add the tomatoes. Some recipes call for adding just the crushed tomatoes without the water from the can and then adding the tomato paste and using that can for water. Instead, we used the 2 cans of tomatoes (water and all) and then added the paste. This way we didn’t have to add extra water for the paste. Then add the basil, oregano and pepper flakes and stir in completely.

Sauce simmering

Allow this sauce to simmer for at least 2 hours on the stove, stirring occasionally. After an hour or so, the tomatoes will start to break down and you can crush them up. We let our sauce simmer for about three hours and then served it over some homemade spaghetti pasta.

Finished SauceWhen we finished simmering this sauce, we served it over the homemade pasta and had a side salad. It was so good was jokingly called it “Red Gold”!

Plated pasta and sauce

UPDATE: I just found recent posting on Soffritto from one of the people I follow on WordPress so I wanted to share a link to Barry’s published article “Soffritto: The Holy Trinity

Buckwheat Pasta on the Chitarra

Buckwheat pasta

OK, this was an experiment. I’ve only made pasta from scratch twice before. Both times I followed the recipes on my New Years Day post. For some crazy reason, today we tried to use a different flour so we chose a buckwheat flour. I didn’t adjust the recipe and made it just as if it were regular white flour. After I got to the part that it was resting, I decided to search online for buckwheat noodles. Yikes, I thought – I quickly learned that buckwheat doesn’t have enough gluten to hold the pasta together. Everything I read explained why I had so much trouble with my dough. What happened was that it stayed very sticky like it was too moist but it was also very brittle and kept breaking, like it was too dry. What I learned was that you need to mix in some regular white flour to give it the gluten to give it strength and keep it from breaking up. It looks like a good ratio is 25% white flour and 75% buckwheat flour.

Buckwheat flour

Working with the dough was a challenge because it didn’t have the white flour added. When I try this again, I am going to follow the recipe at FXCuisine.com for Italian Alpine Buckwheat Pasta because it sounds really good.

This recipe gives you 5 to 6 servings. If you make more than you need, don’t worry. I’ve learned that you can freeze the extra and it will keep the fresh pasta taste and texture. Each time I have made past, I made extra and froze it because it is great for a fresh pasta experience in the middle of the week when you don’t have time to actually make fresh pasta. Keep this little tip in the back of your mind the next time you make fresh pasta.

Ingredients

  • 2 1/4 cups buckwheat flour
  • 3 eggs
  • 3/4 teaspoon salt
  • 1 tablespoon olive oil
  • 1 tablespoon lukewarm water

The basics of making pasta is actually pretty easy. Make your mound of dry ingredients and then build a well in the center where you put your eggs, olive oil and water. Gradually mix the flour into wet mixture. You’ll slowly run out of dry flour on the outside of the well. By this time, you need to keep mixing. I always find this point to be alarming because it doesn’t seem like it will actually mix together. In a sense, it seems too dry but then I keep mixing and suddenly, it comes together. This time, it stayed tacky but it didn’t feel too moist. I kneaded it for longer than I thought necessary and then decided to let rest and see what happens. I thought that if I kept kneading it, the pasta would firm up a bit and be less sticky. This didn’t happen, even after adding a little more flour.

Buckwheat dough resting

I let my dough rest for 30 minutes and then took it out to roll it. I pulled off about 1/4 of the dough and started to roll it. It was still pretty tacky and even with a dusting of flour, it didn’t want to roll out very well. I finally got this piece rolled out and started on the next piece. While I was rolling out the second piece, I decide to dust it with regular flour, this helped a little so I tried to incorporate it into the dough. This actually seemed to helped. I added about a tablespoon of regular flour into this fist-sized ball of dough. I then added regular four to the remaining dough, kneaded it some more, and let it rest again. At this point, I still had my original rolled out section so I decided to leave it as a comparison but I did give it a dusting of regular flour and let it sit out covered with a towel while I let the rest of the dough rest.

Rolled Dough

While all this dough was resting, I did a little more research online and came across Rustico Cooking. They have a post about using the chitarra and one of their suggestions is to let the dough dry a little after you’ve rolled it out. They suggested about 15 minutes but I went about 30 minutes. This did seem to help compared to previous attempts. The 30 minute wait time would probably be too long for standard pasta but I think it was good for the buckwheat pasta.

When I rolled out the remaining pasta, it was a little easier than the first section, but it was brittle and sticky. I just took my time and tried to roll out smaller sections at a time. I ended up with some scraps of rolled dough. We put it in a zip-lock bag and are freezing it. I don’t know what we’ll do with it but we’ll find something 🙂

We used our chitarra to cut the pasta. This fun little pasta cutter comes from the Abruzzo region of Italy. It makes a square shapes pasta and it’s probably the easiest cutter you can use.

Dough on Chitarra

Cutting the pasta on the chitarra

For dinner, we used the pasta from the first batch, that is the pasta that didn’t have any of the regular white flour added to it. It cooked up fine and had a earthy flavor. It wasn’t as creamy as when I have made the pasta with regular flour, but it went perfectly with the lentils. I will update this post once we use the noodles from the dough that had the white flour added. In the meantime, we put the pasta noodles into a zip-lock bag and stored it in the freezer.

Pasta & Lentils

Lentils are supposed to bring you good luck for the new year, according to Italian tradition. This tradition goes back a long time and it’s said the little bean’s shape signify coins – thus the association with prosperity for the coming year. I’ve never cooked them before so I was surprised at how easy they are to prepare. I am used to thicker beans that require long soaks to soften them.

For this New Years Eve dinner, I adapted a recipe I found in Breaking Bread in L’Aquila. This recipe comes from Santo Stefano di Sessanio. I didn’t intentionally change the recipe but I did change it because I didn’t have all the ingredients she calls for. Plus, the side note says you can make substitutions and the whole book is about home cooking and using what’s available.

Ingredients

  • 1 1/2 cup of dry lentils
  • 2 tablespoons of extra virgin olive oil
  • 4 ounces of pancetta (cut in 1/4 inch pieces)
  • 1 large onion, chopped. We used a large yellow onion
  • 1 clove of chopped garlic, finely chopped
  • 1 pound of spaghetti (I used our homemade pasta)
  • Salt & Pepper to taste
  • Fresh grated Parmigiano
  • 2 tablespoons finely chopped parsley for garnish

Instructions

Bring salted water to a boil in a medium sauce pan. Now, add the lentils, cover and cook over medium heat, stirring occasionally. Cook until the lentils are tender but not mushy. The official recipe says this should take about 20 minutes. Since I haven’t cooked them before, I did just as directed, however, my lentils were more on the mushy side so I will probably cut back on the time by a couple minutes. I think 17 to 18 minutes might have been best. Once cooked, drain the lentils and set aside.

Lentils boiling

Using a large pot, cook your pasta. I used the pasta we made on the chitarra but if you’re using packaged dry pasta, just follow the directions on the package. My pasta took longer than expected but it was kind of thick. Like, a .lot thicker than normal but we actually really liked it. Who knew it would make a difference?

Pasta

While you’re cooking your pasta, heat the olive oil in a medium sauce pan over medium-high heat. Add the pancetta, onions and garlic. Here’s where we differed. I used bacon because I didn’t have pancetta. Also, we didn’t have enough bacon but we had this with pork roast, so I used some of the drippings from the pork roast to add a meaty flavor. Cook this for about 7 to 10 minutes. I went until the onions were starting to get translucent. At this point, add the lentils, salt and pepper. Also, drain your pasta and reserve 1/4 cup of the water to add to the lentils to make them creamy. To be honest, I skipped the step of adding water because I thought it looked moist enough. Sprinkle with parmigiano and garnish with the parsley.

I wish I had taken a better picture of the final product, but to be honest, my household was too hungry to wait for another picture. I’ll try this recipe again and try to get some better pictures then.Lentils

Chitarra pasta cutter

Chitarra

This is our new toy – a chitarra pasta cutter. This pasta cutting tool comes from Abruzzo, Italy. The device has strings on both sides, one side cuts thicker noodles and the second side cuts has thin noodles. Since this is our first attempt, I decided to use the thicker side. I started with the pasta that I prepared in the previous post for fresh pasta dough.

Rolled pasta

We cut this sheet of pasta into three wide strips that we put on the chitarra. It’s actually really simple to roll the pasta and gently push it through the wires. One thing to make sure is that the pasta dough has been floured on both sides to keep it from sticking together.

Pasta on chitarra

Once you lay it out, as shown above, take your rolling pin and gently roll it so the wires cut it into strips. You have to use a little force and sometime just use your fingers to get it to go all the way through.

Cutting the pasta

As you can see, my sheet of dough was longer than the chitarra. I just gently pulled the sheet towards me and kept rolling. The pasta just sort of folded over itself under the wires. The slot under the wires is slanted so once you’ve cut it, just tilt the chitarra and the pasta will fall out to the side.

Cut pasta on chitarra

Now that the pasta is cut, most people recommended to let it dry for a little while. Some say you can cook it immediately, but most of the things I ready suggested letting it dry and that this helps keep it from sticking to itself while it’s cooking. We don’t have a drying rack so we took a baking sheet and propped it up on the stove. Then we laid the pasta strips on the baking sheet and let them dry from about an hour. We’re putting this into a pasta and lentil dish for New Years Eve.

Cut pasta drying on the rack

Update – Since this was originally posted, we’ve purchased a pasta roller with a cutter attachment. Even though the roller has the cutter attachments, we still keep coming back to the chitarra. The pasta cut from the chitarra has a great size and we just think the chitarra is so easy and fun to use.